YottaDB and a tale of two Pis
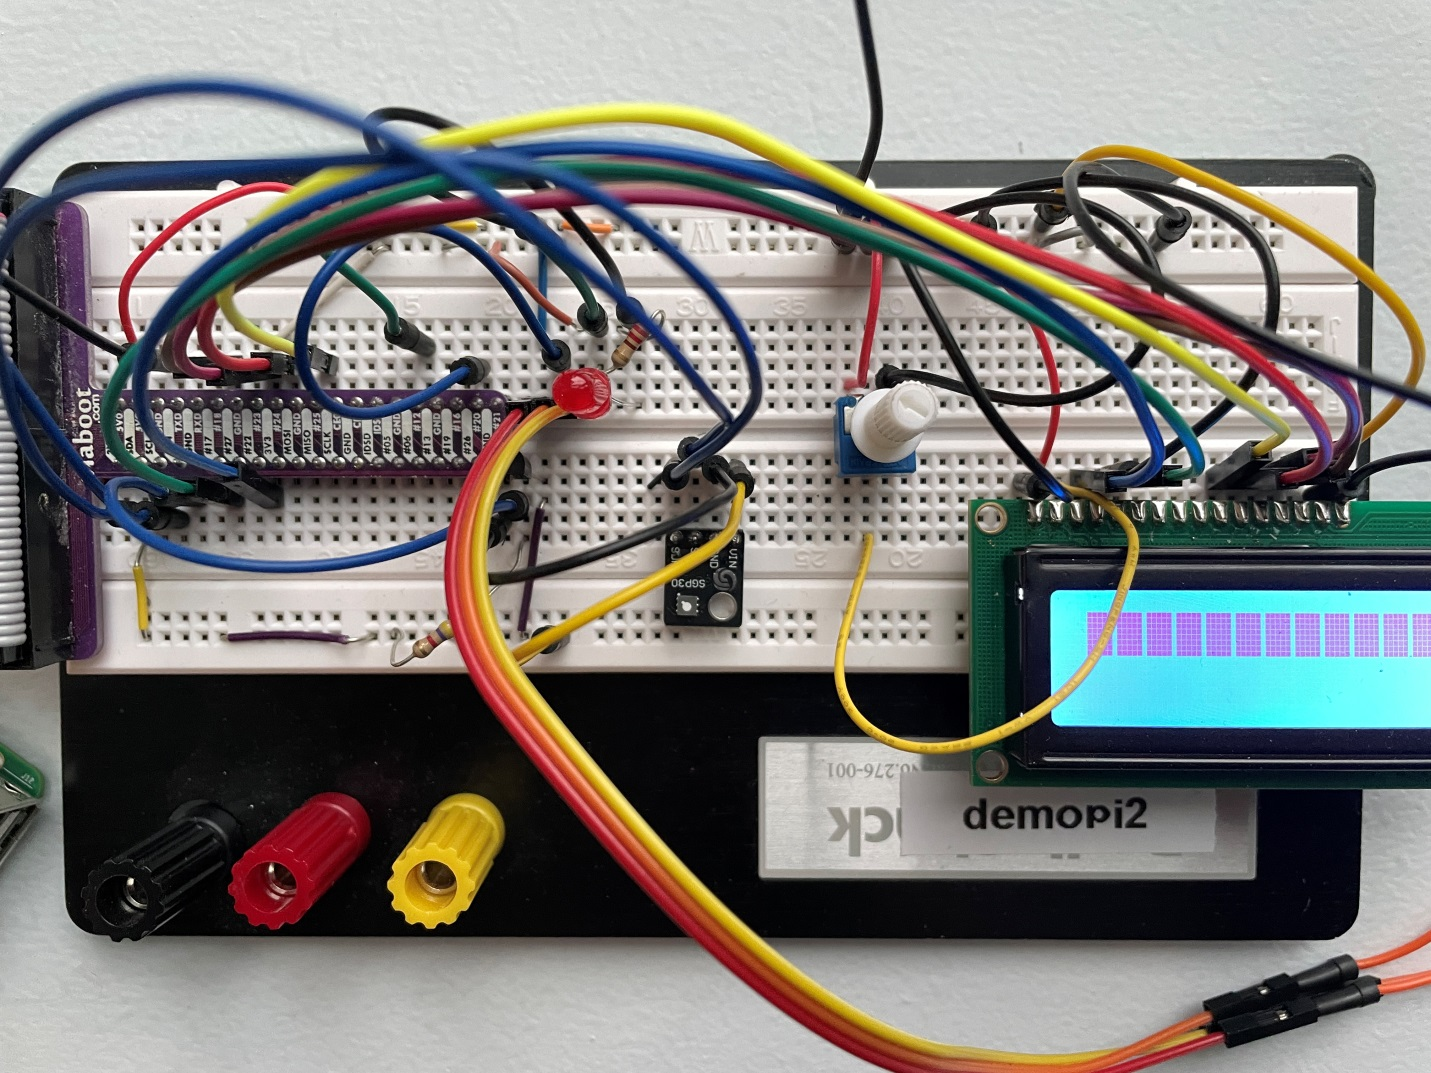
The full demopi2 breadboard.
This tutorial describes a YottaDB installation on two Raspberri Pis. The first Pi has Temperature, Motion, CO2, sensors with an LCD display to immediately display the data. This Pi stores the data in YottaDB, then streams it over to the second Pi using YottaDB's replication. This data is then exposed via SQL and graphed in Excel.
The full code is available in demopi.py.
Components
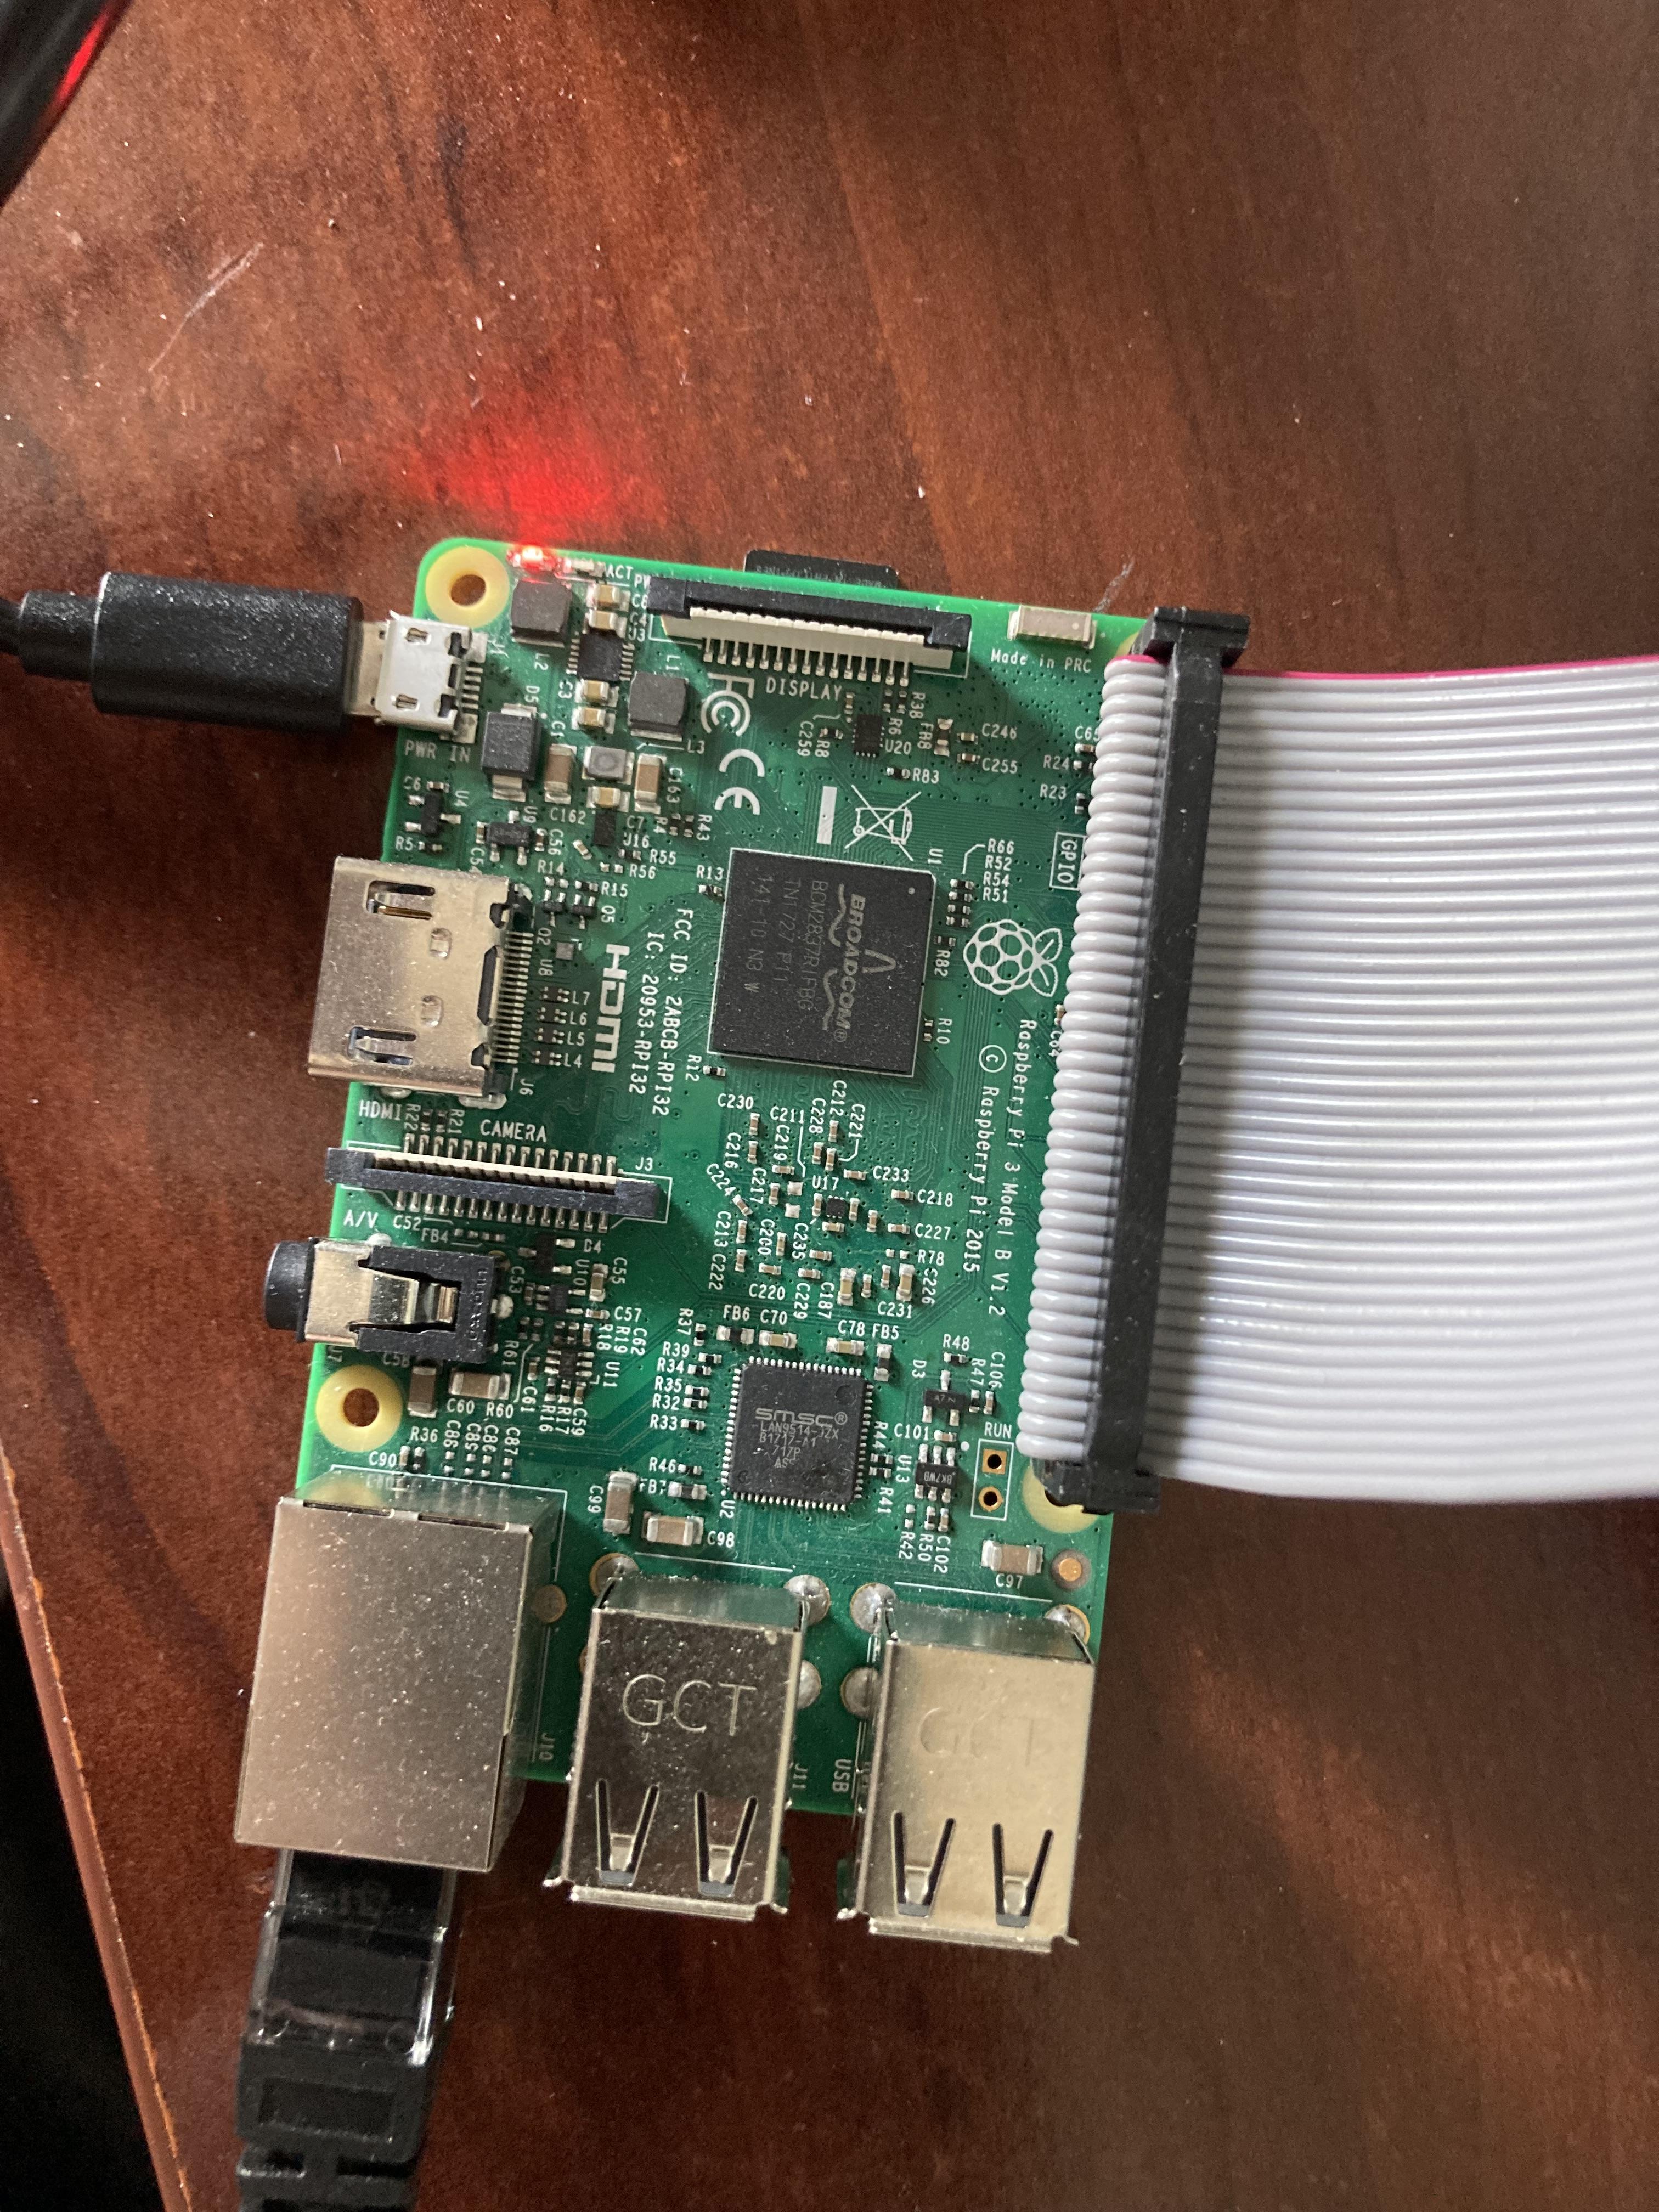
Two Rapsberry Pis 3 Model B
1-Wire Temperature sensor
PIR Motion Sensor with Red LED Light
CO2/Noxious Gases sensor
LCD Display
Software Installation
Both Pi's have straight Debian 11 (bullseye) installed and YottaDB per the instructions on how to Get Started:
apt-get install -y --no-install-recommends file binutils libelf-dev libicu-dev nano wget ca-certificates
mkdir /tmp/tmp
wget -P /tmp/tmp https://download.yottadb.com/ydbinstall.sh
cd /tmp/tmp
chmod +x ydbinstall.sh
sudo ./ydbinstall.sh --utf8 --verbose --octo
./ydbinstall.sh --help
source $(pkg-config --variable=prefix yottadb)/ydb_env_set
On the Pi with the sensors, a.k.a. "demopi2", we first enabled 1-wire protocol kernel support. Then, we ran the following commands:
sudo apt install python3-pip
pip3 install yottadb --user
In the examples below, the hostname of the Pi receiving the sensor data is "demopi2". demopi2 sends the data over to demopi1 via YottaDB Replication. Then, data is graphed from demopi1 using Excel.
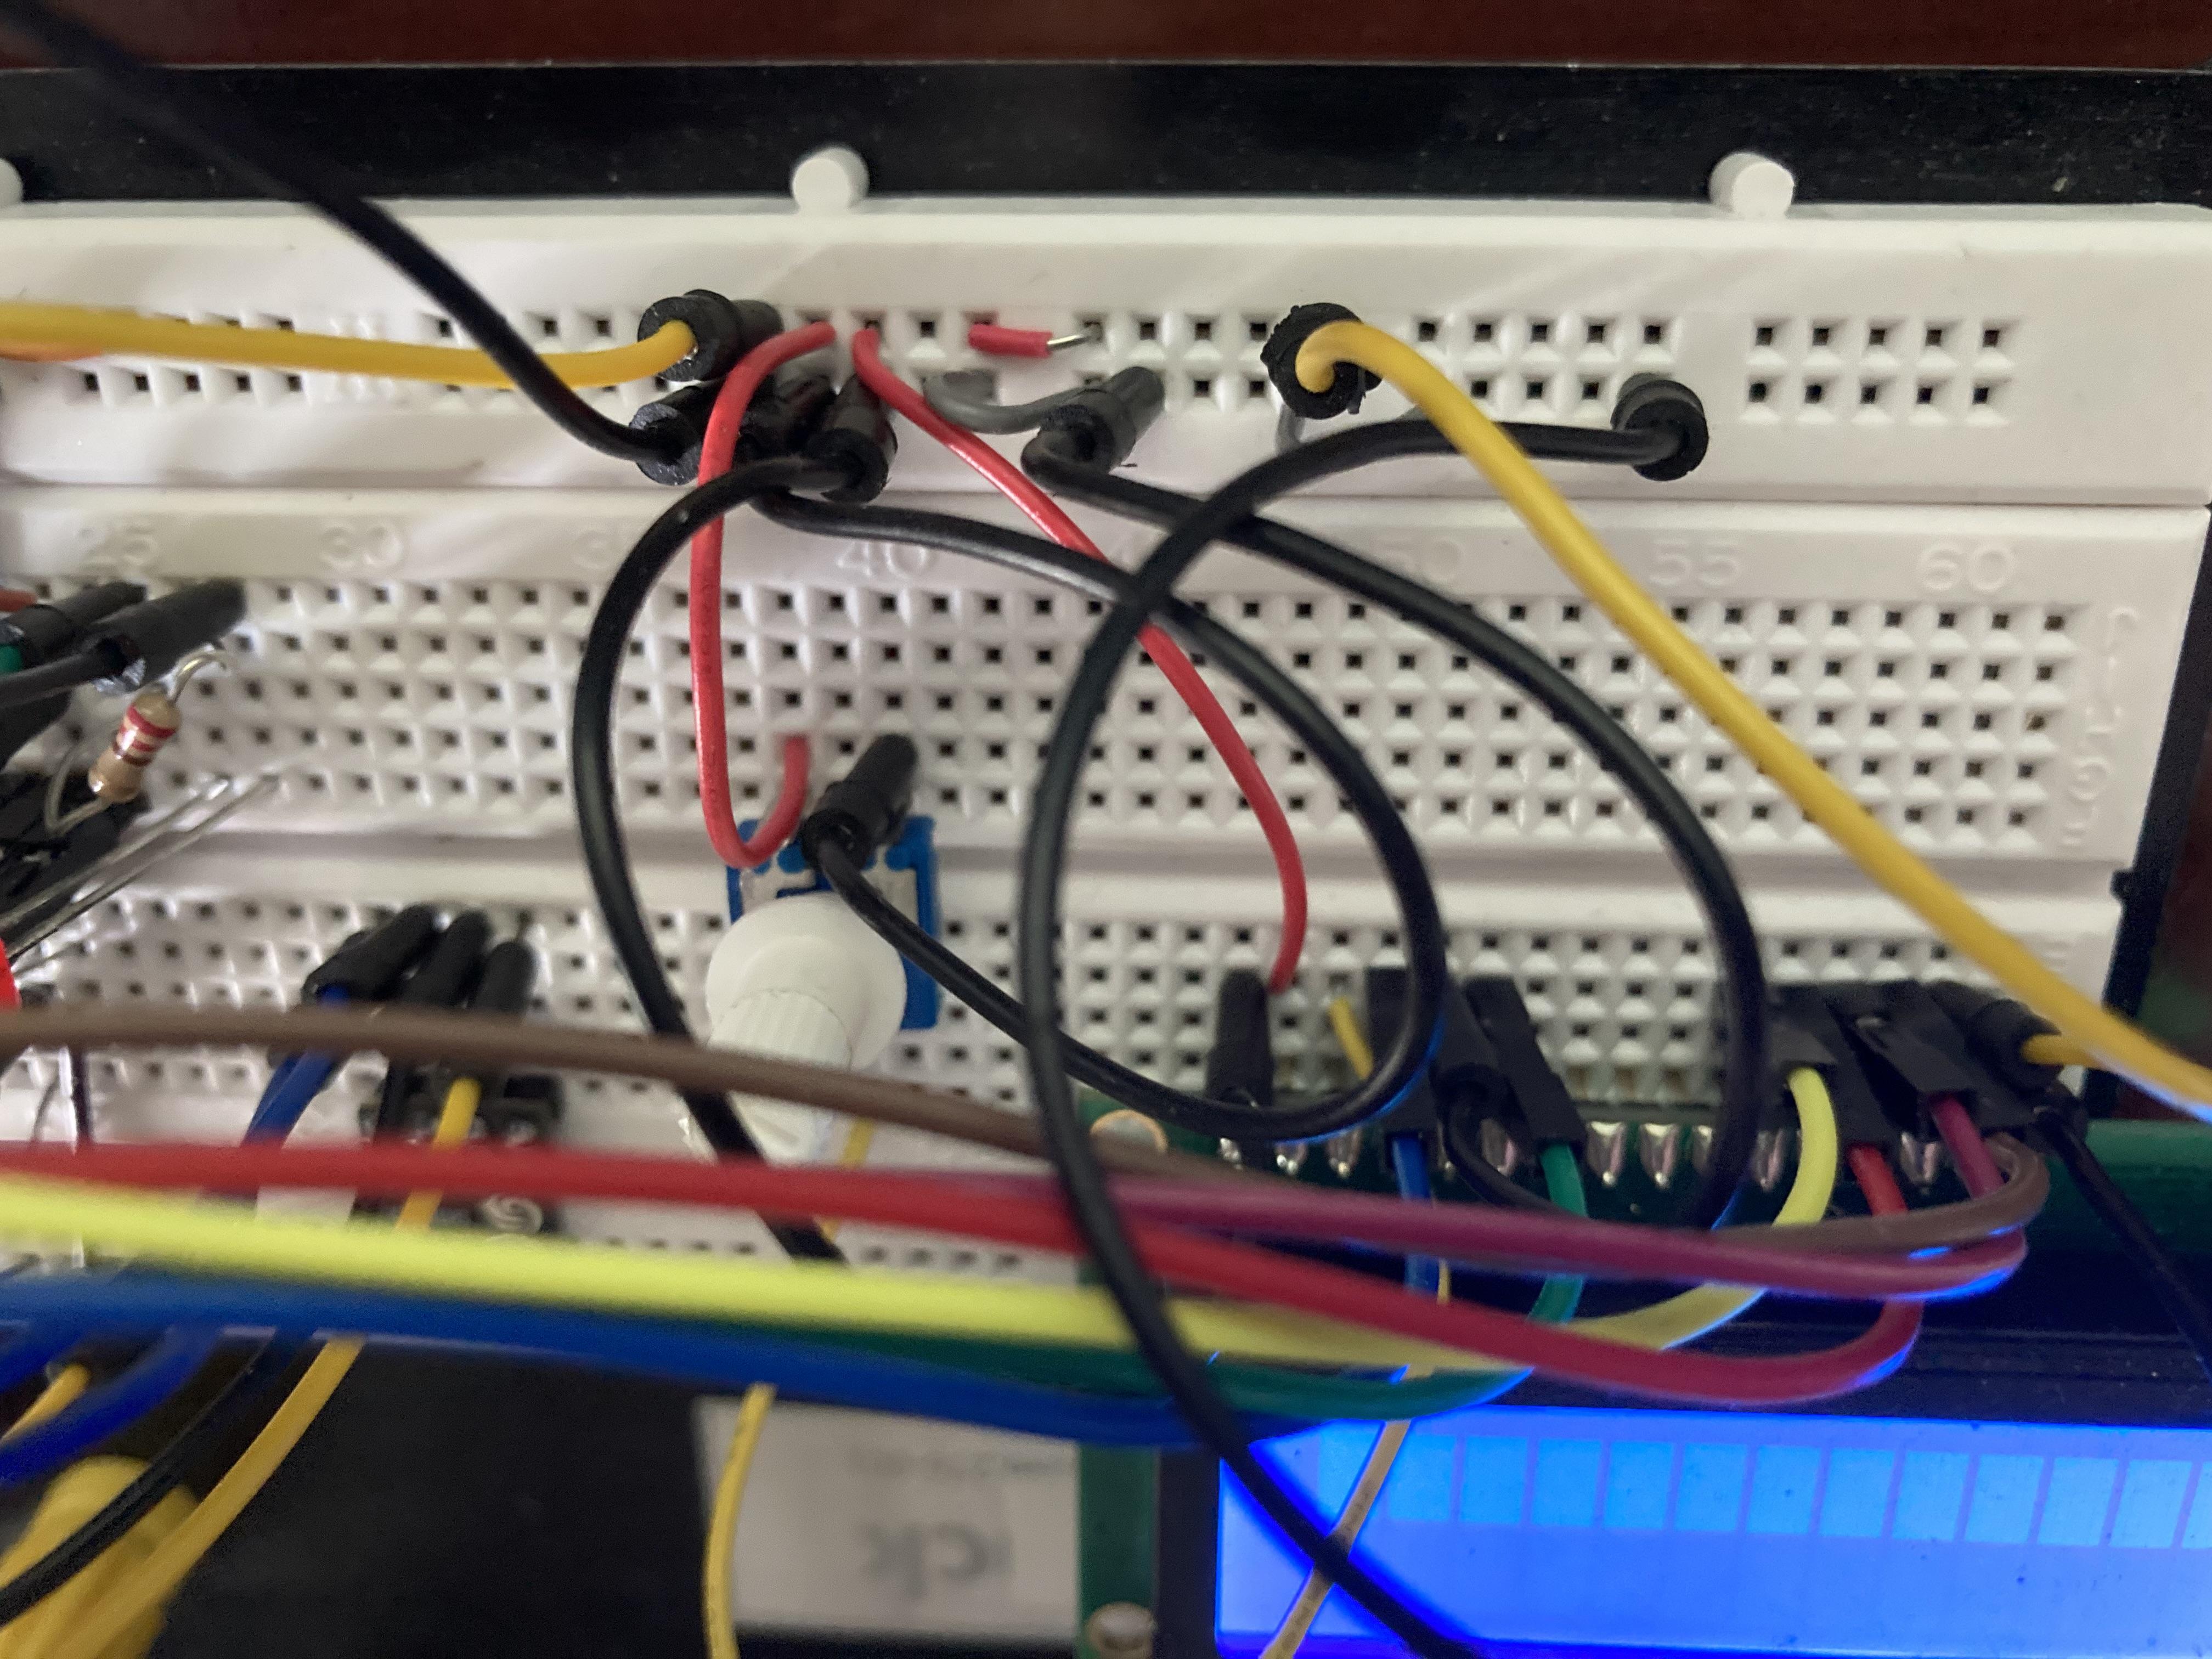
demopi2 and its connections.
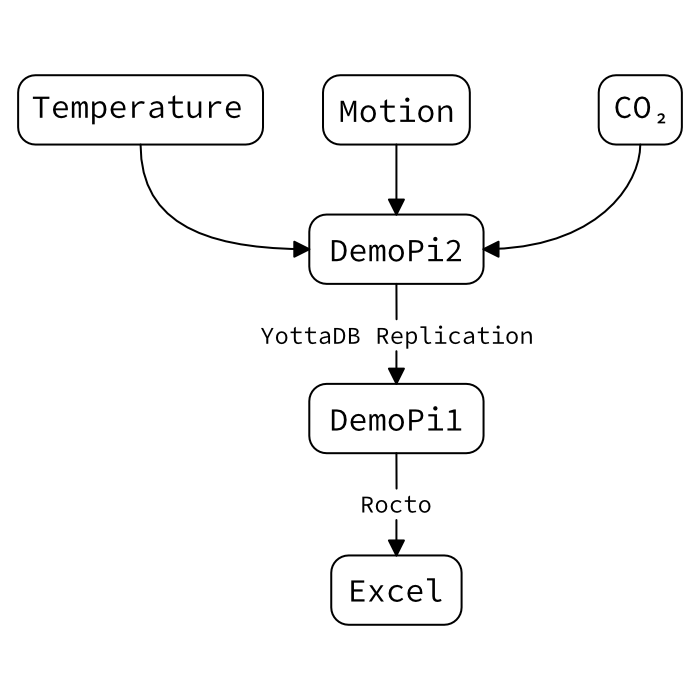
The flow of data between demopi1 and demopi2.
Hardware Installation
Wire Temperature sensor
The wire temperature sensor was installed as directed in Raspberry Pi DS18B20 Temperature Sensor Tutorial.
There are three connections, from the flat side facing you, left to right:
Input |
Output |
|
|---|---|---|
1 |
5V |
N/A |
2 |
5V through 4.7k Ohm resistor |
GPIO Pin 4 |
3 |
Ground |
N/A |
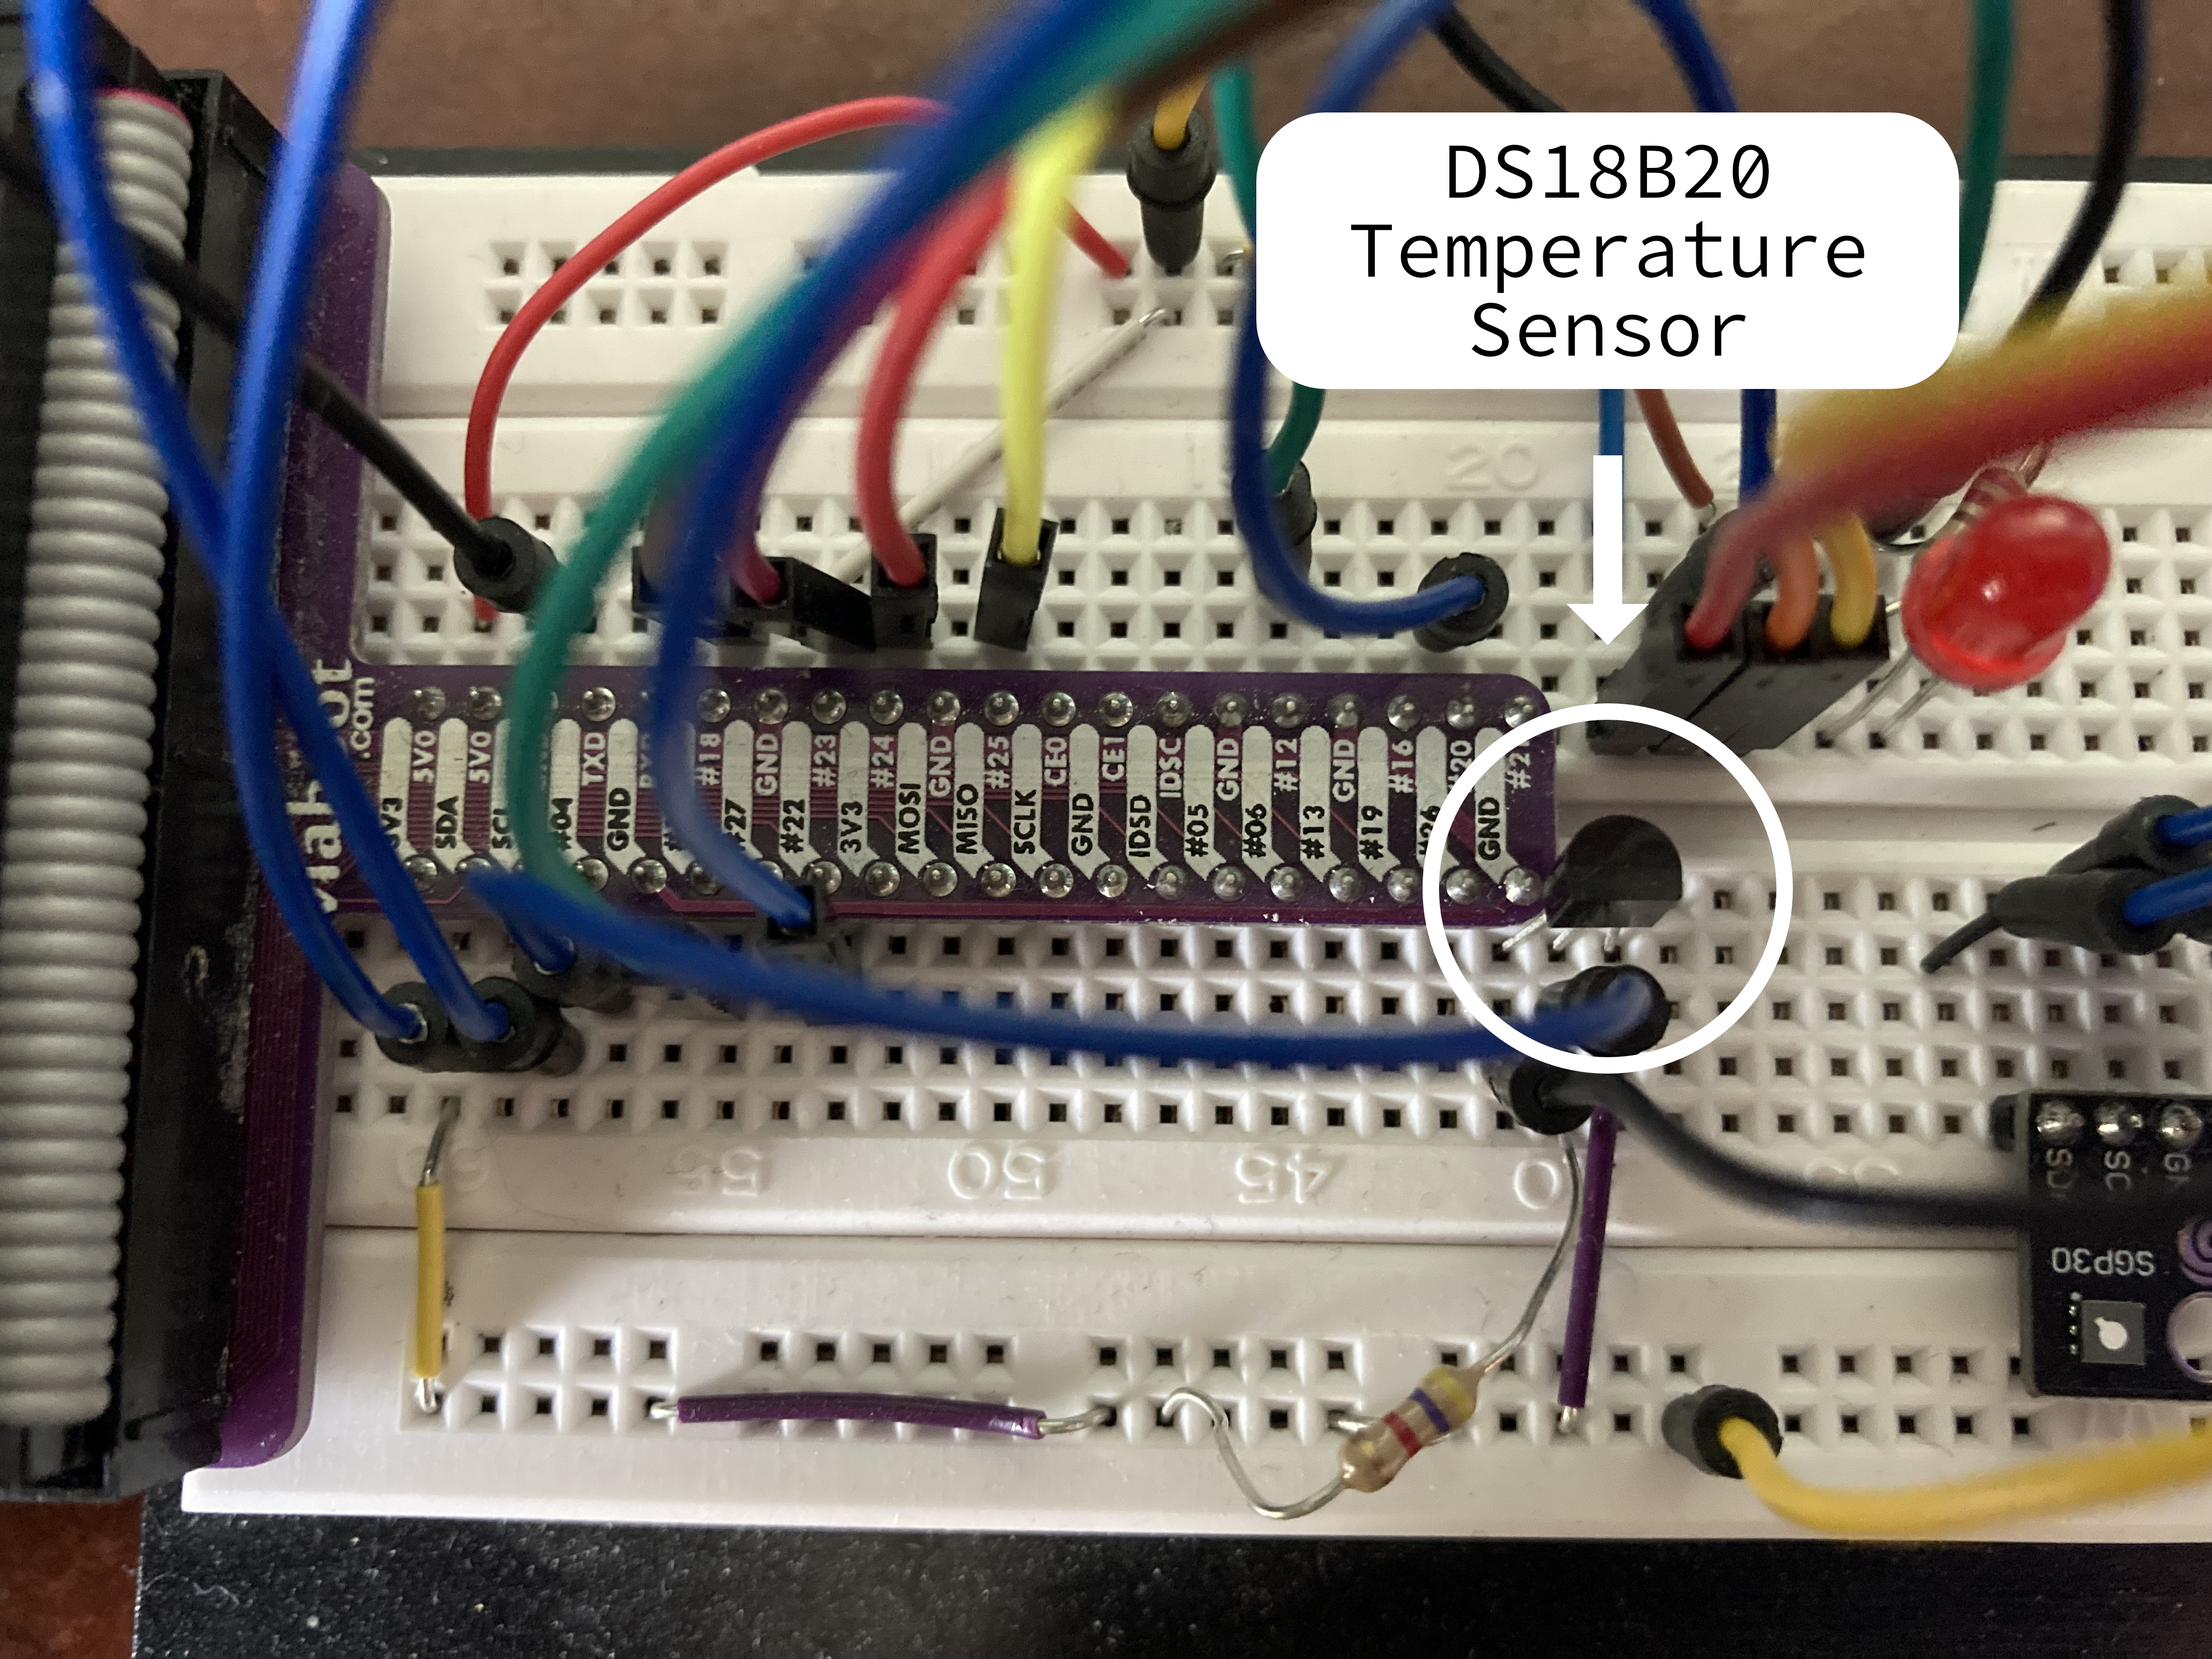
The DS18B20 Temperature Sensor.
After you make the connections, you need to enable the 1-wire protocol. See the link above for instructions.
Here is the code for reading data from the wire temperature sensor:
temp_base_dir = glob.glob('/sys/bus/w1/devices/' + '28*')[0]
temp_file = temp_base_dir + '/temperature'

while True:
    # Other code...
    # Read temperature
    f = open(temp_file, 'r')
    raw_temp = f.readline().strip()

    # If nothing is read (hardware issue), try again…
    if raw_temp == '': continue

    temp_unrounded = int(raw_temp)/1000
    f.close()
temp_rounded = round(temp_unrounded,1)
# Other code...
sleep(1)
PIR Motion Sensor with Red LED Light
The PIR motion sensor setup was derived from How to Interface a PIR Motion Sensor With Raspberry Pi GPIO.
PIR Motion Sensor Pinout:
Input |
Output |
|
|---|---|---|
1 |
5V |
N/A |
2 |
GPIO Pin 20 |
|
3 |
Ground |
N/A |
Led Pinout:
Input |
Output |
|
|---|---|---|
Long leg |
GPIO 12 through a 220 Ohm resistor |
N/A |
Short leg |
Ground |
N/A |
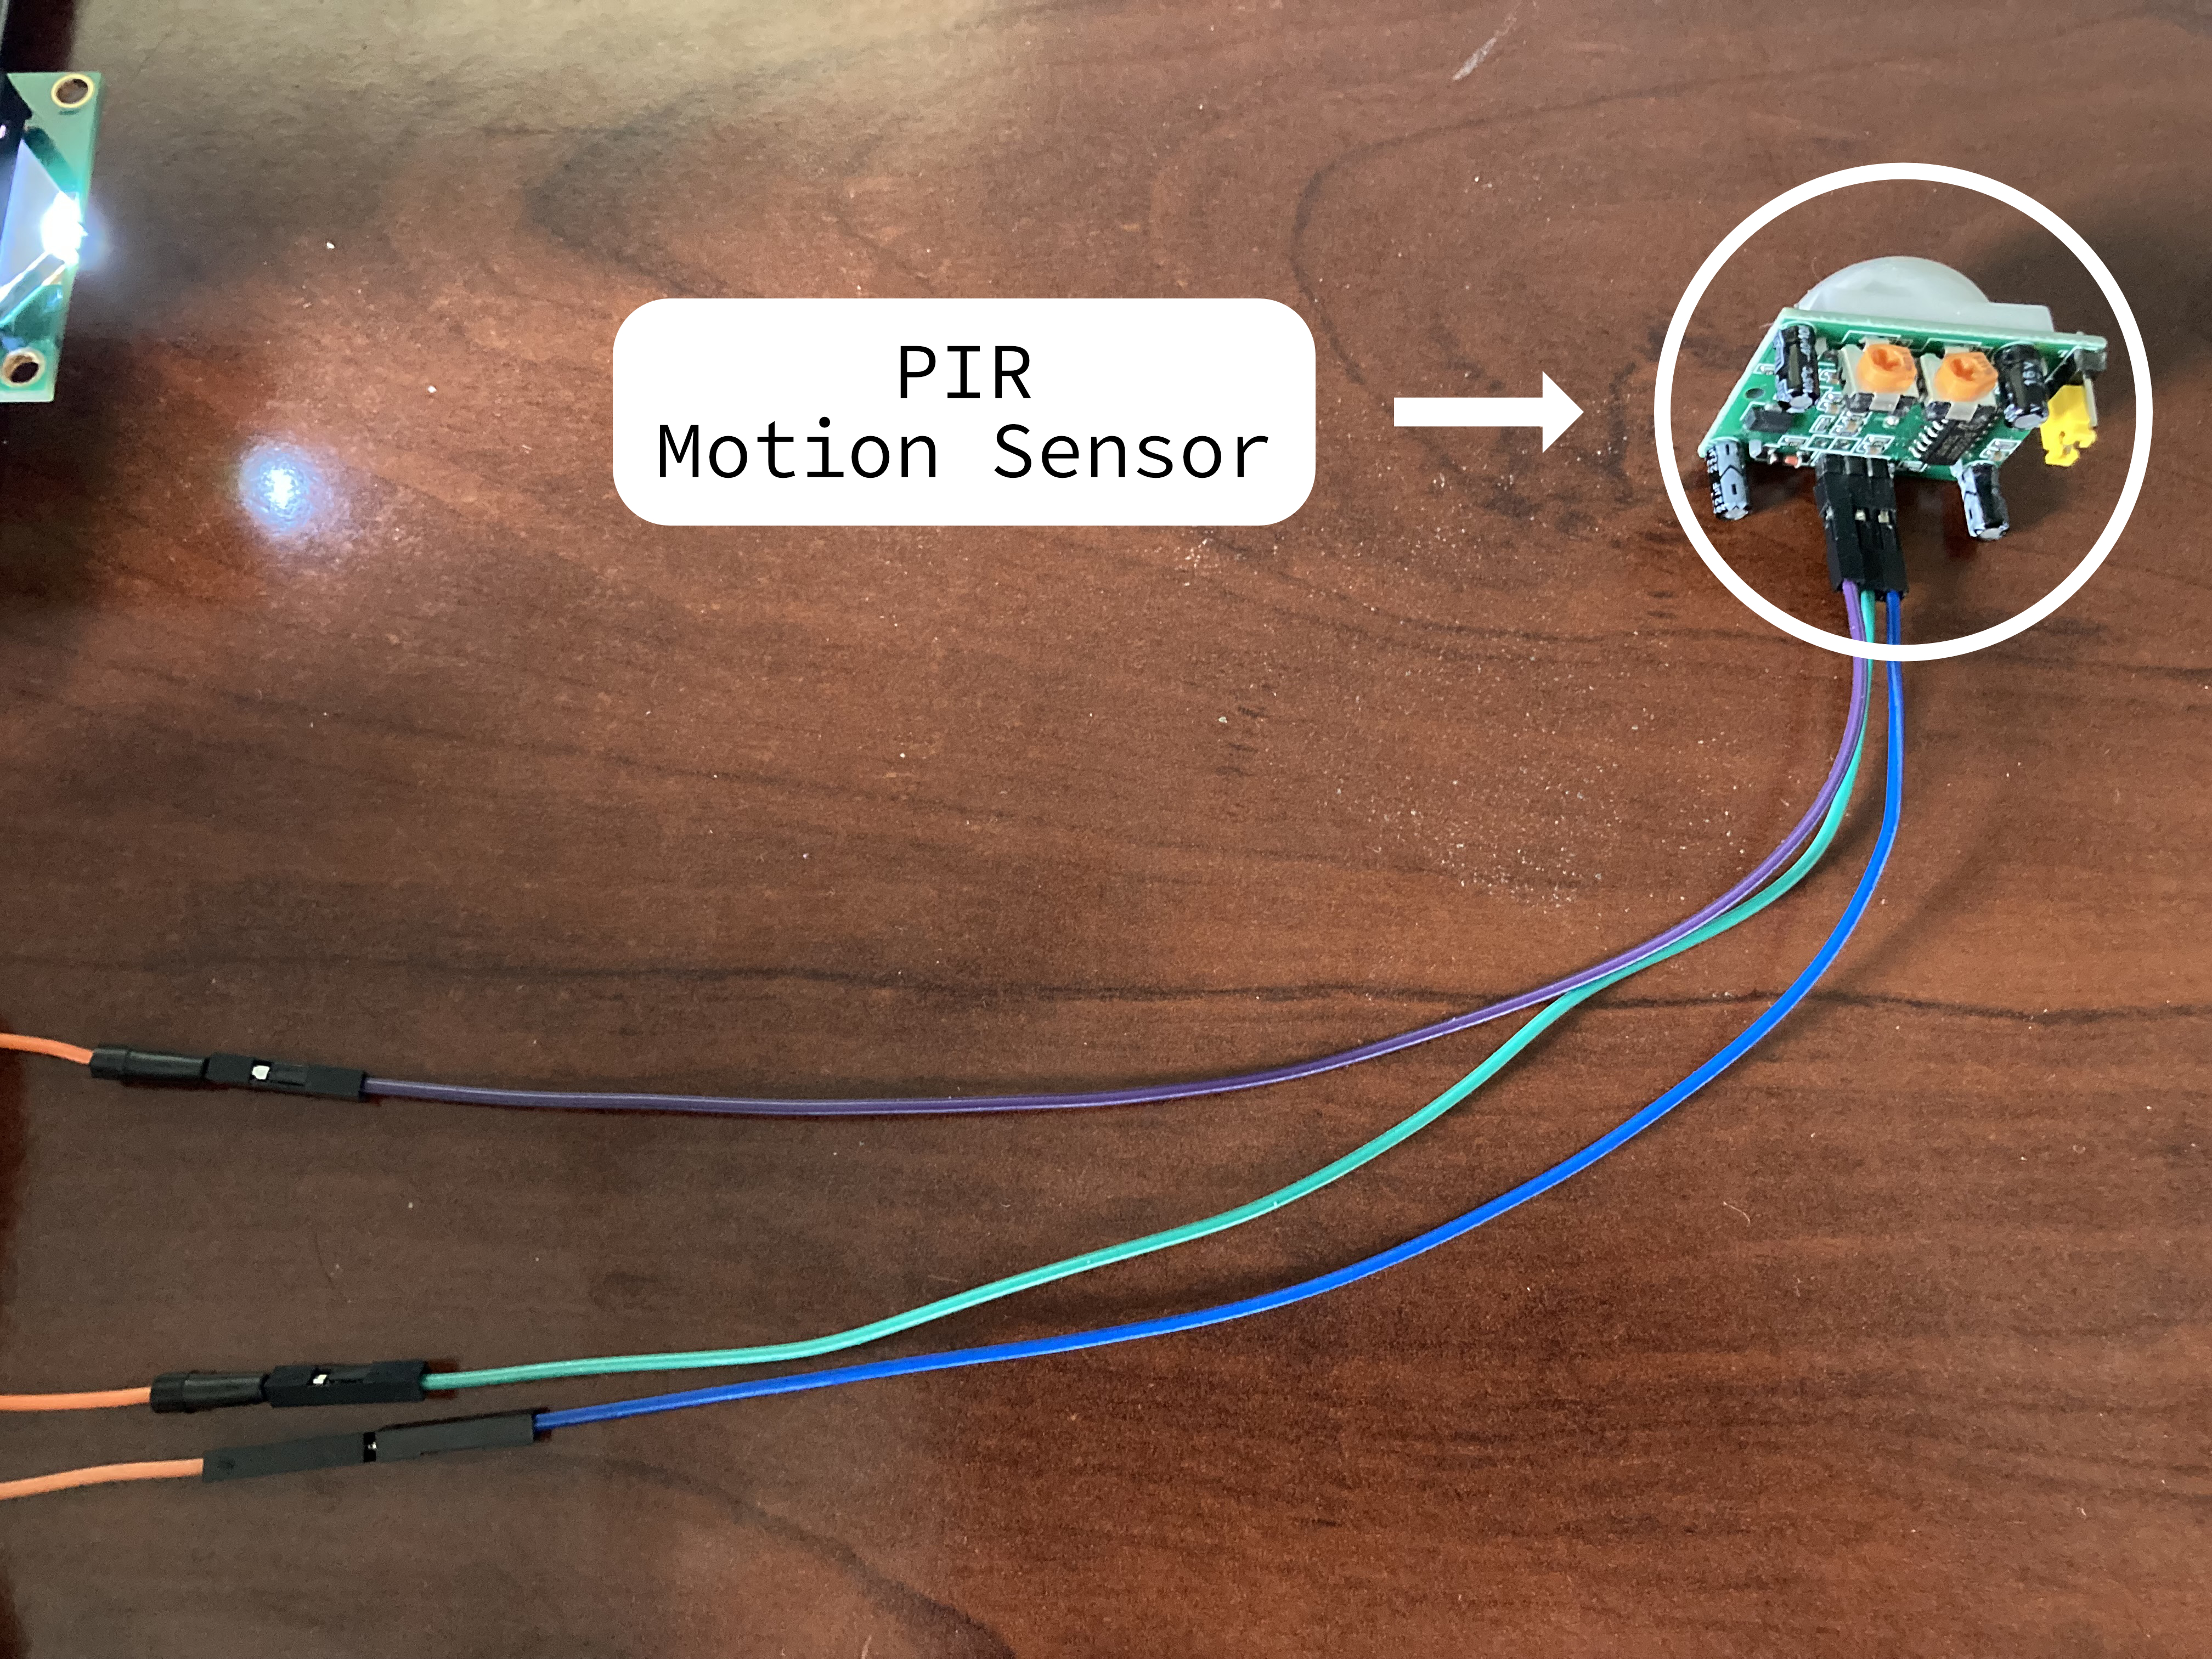
The PIR motion sensor.
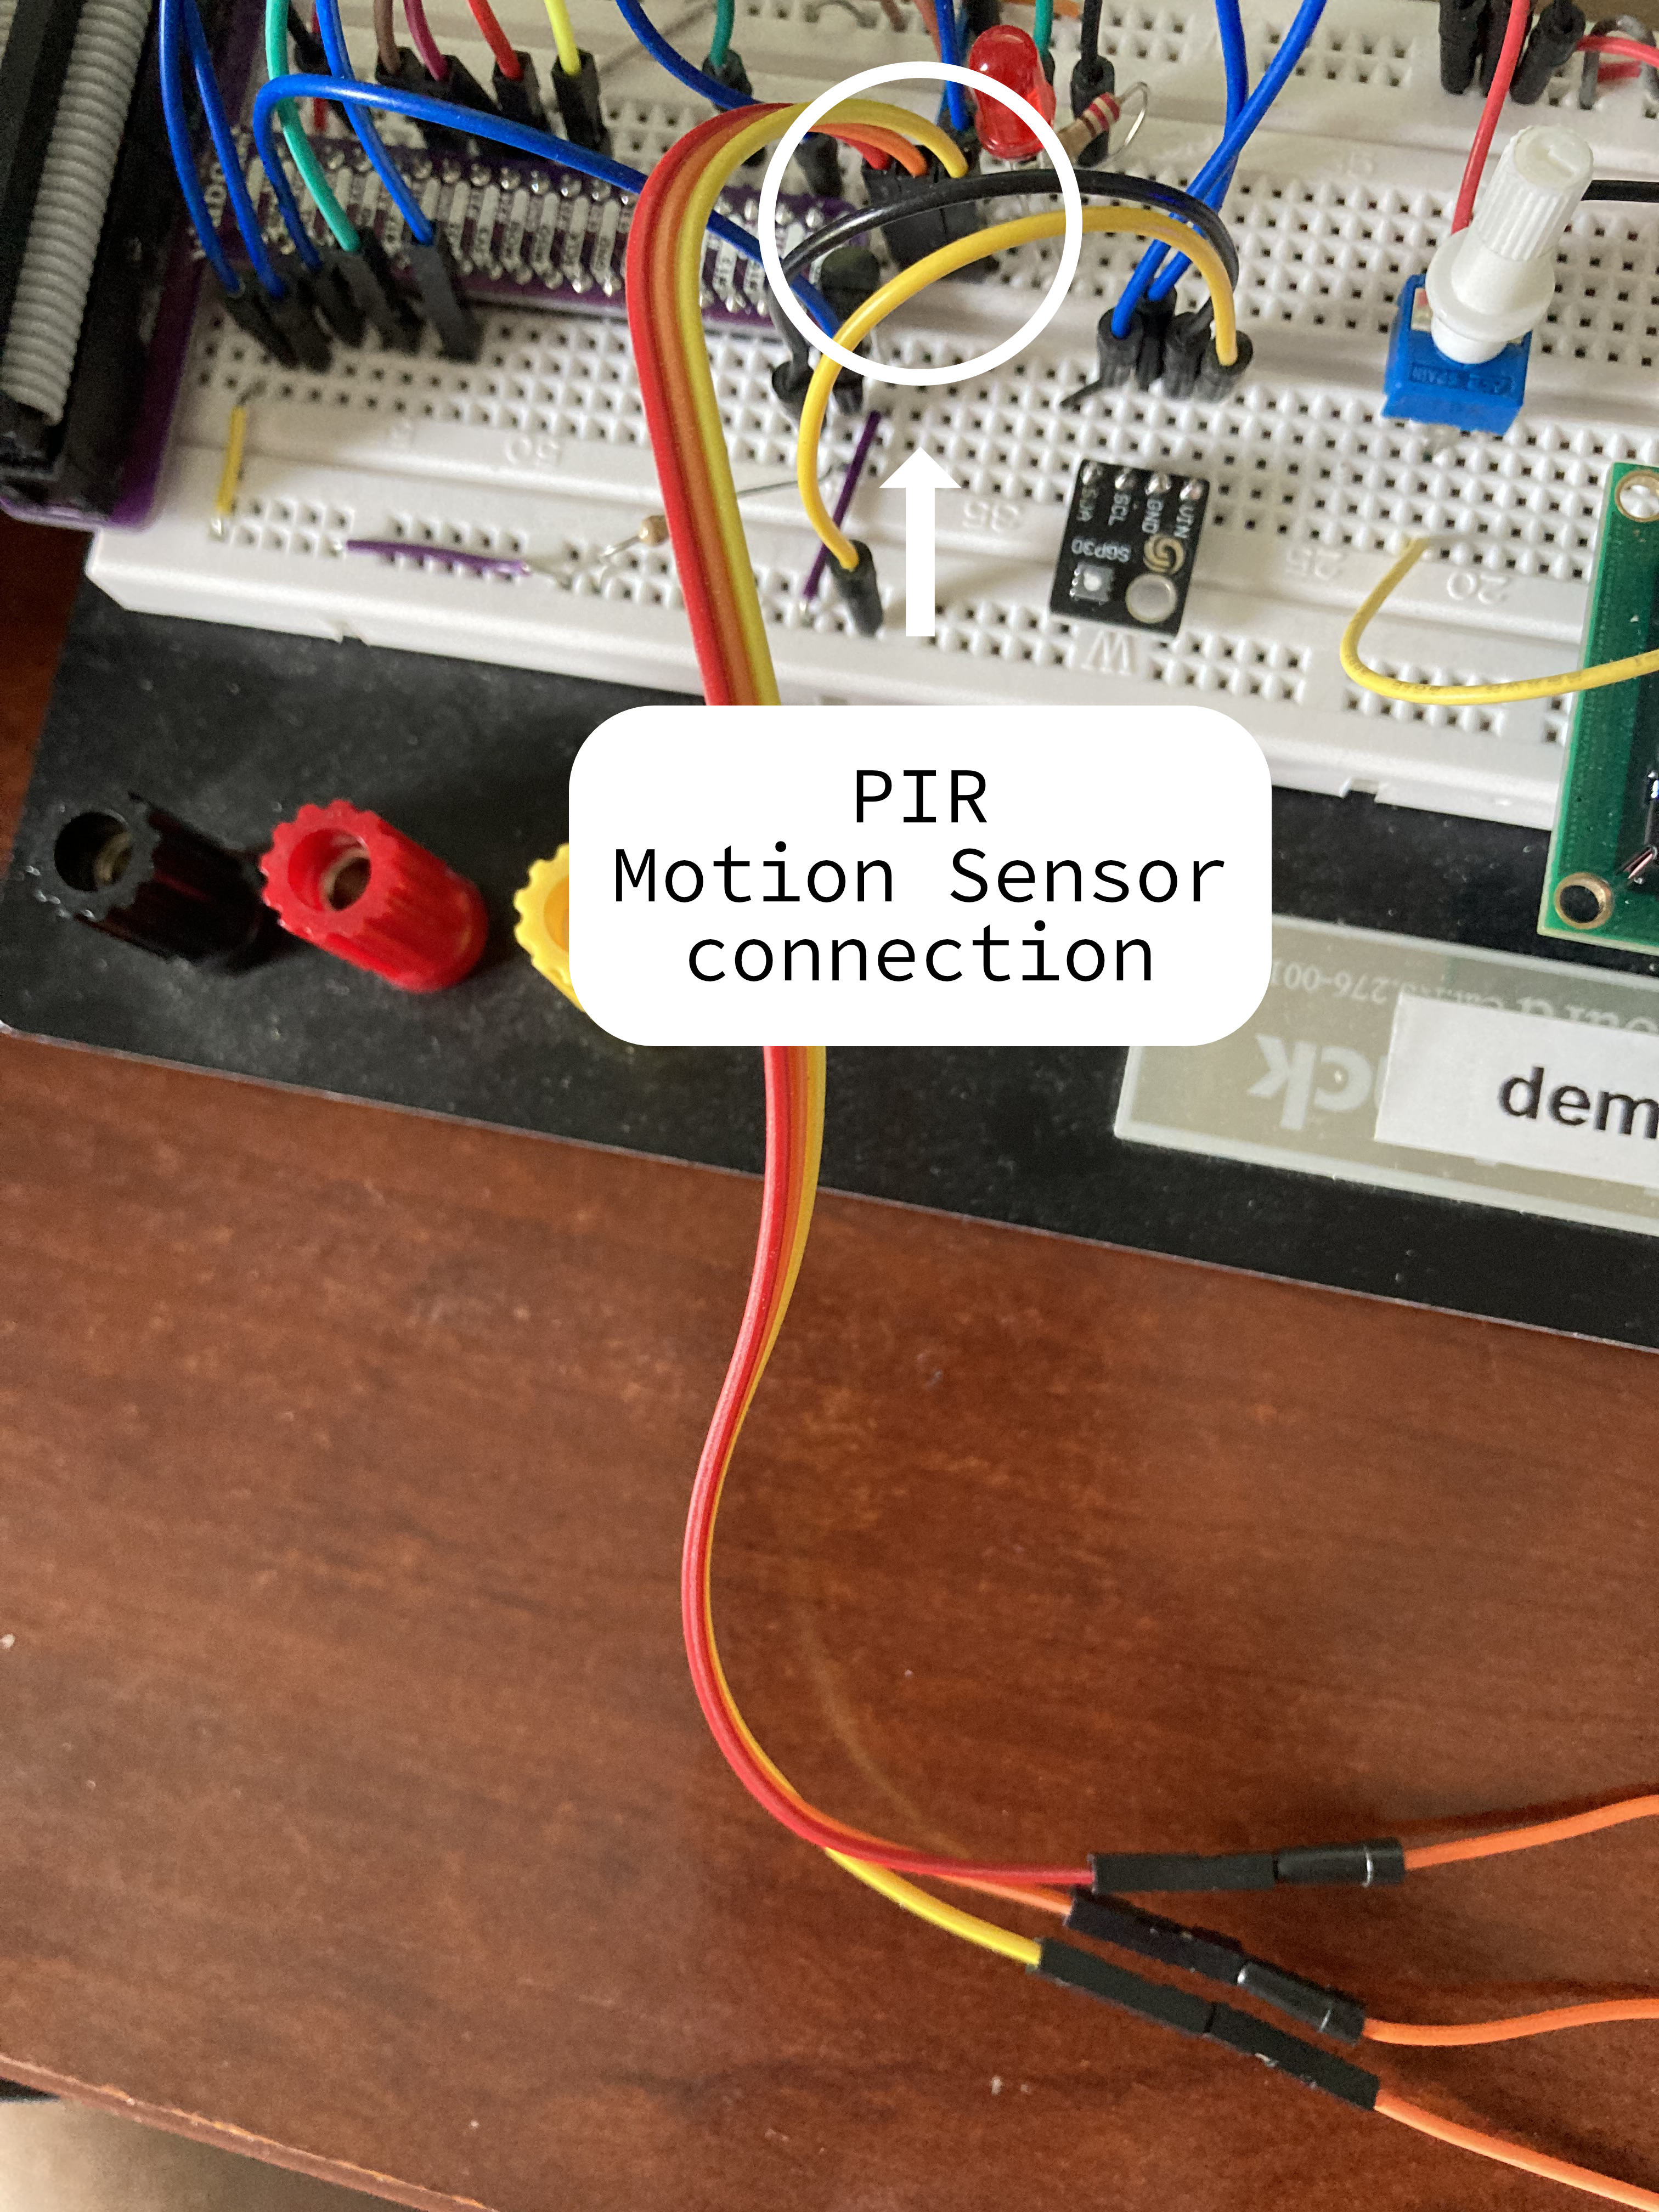
How the PIR motion sensor connects into the breadboard.
Here is the code for the PIR motion sensor setup:
# pir at BCM port 20
# PIR sensitivity (detect range) can be tuned by adjusting the screw on the right side of the buzzer
# led at BCM port 12
pir_gpio = 20
led_gpio = 12

GPIO.setmode(GPIO.BCM)
GPIO.setup(pir_gpio, GPIO.IN)
GPIO.setup(led_gpio, GPIO.OUT, initial=GPIO.LOW) # Led off by default

while True:
    # Other code...
    # Read motion sensor
    pir_out = 0
    if(GPIO.input(pir_gpio) == 0):
        pir_out=0
        GPIO.output(led_gpio, GPIO.LOW)
    elif(GPIO.input(pir_gpio) == 1):
        pir_out=1
        GPIO.output(led_gpio, GPIO.HIGH)

# Other code...
CO2/Noxious Gases sensor (gy-sgp30)
The CO2/Noxious gases sensor was set up by following the SGP30 documentation.
Pinout:
Input |
Output |
|
|---|---|---|
VIN |
5V |
N/A |
GND |
Ground |
N/A |
SCL |
N/A |
SCL |
SDA |
N/A |
SDA |
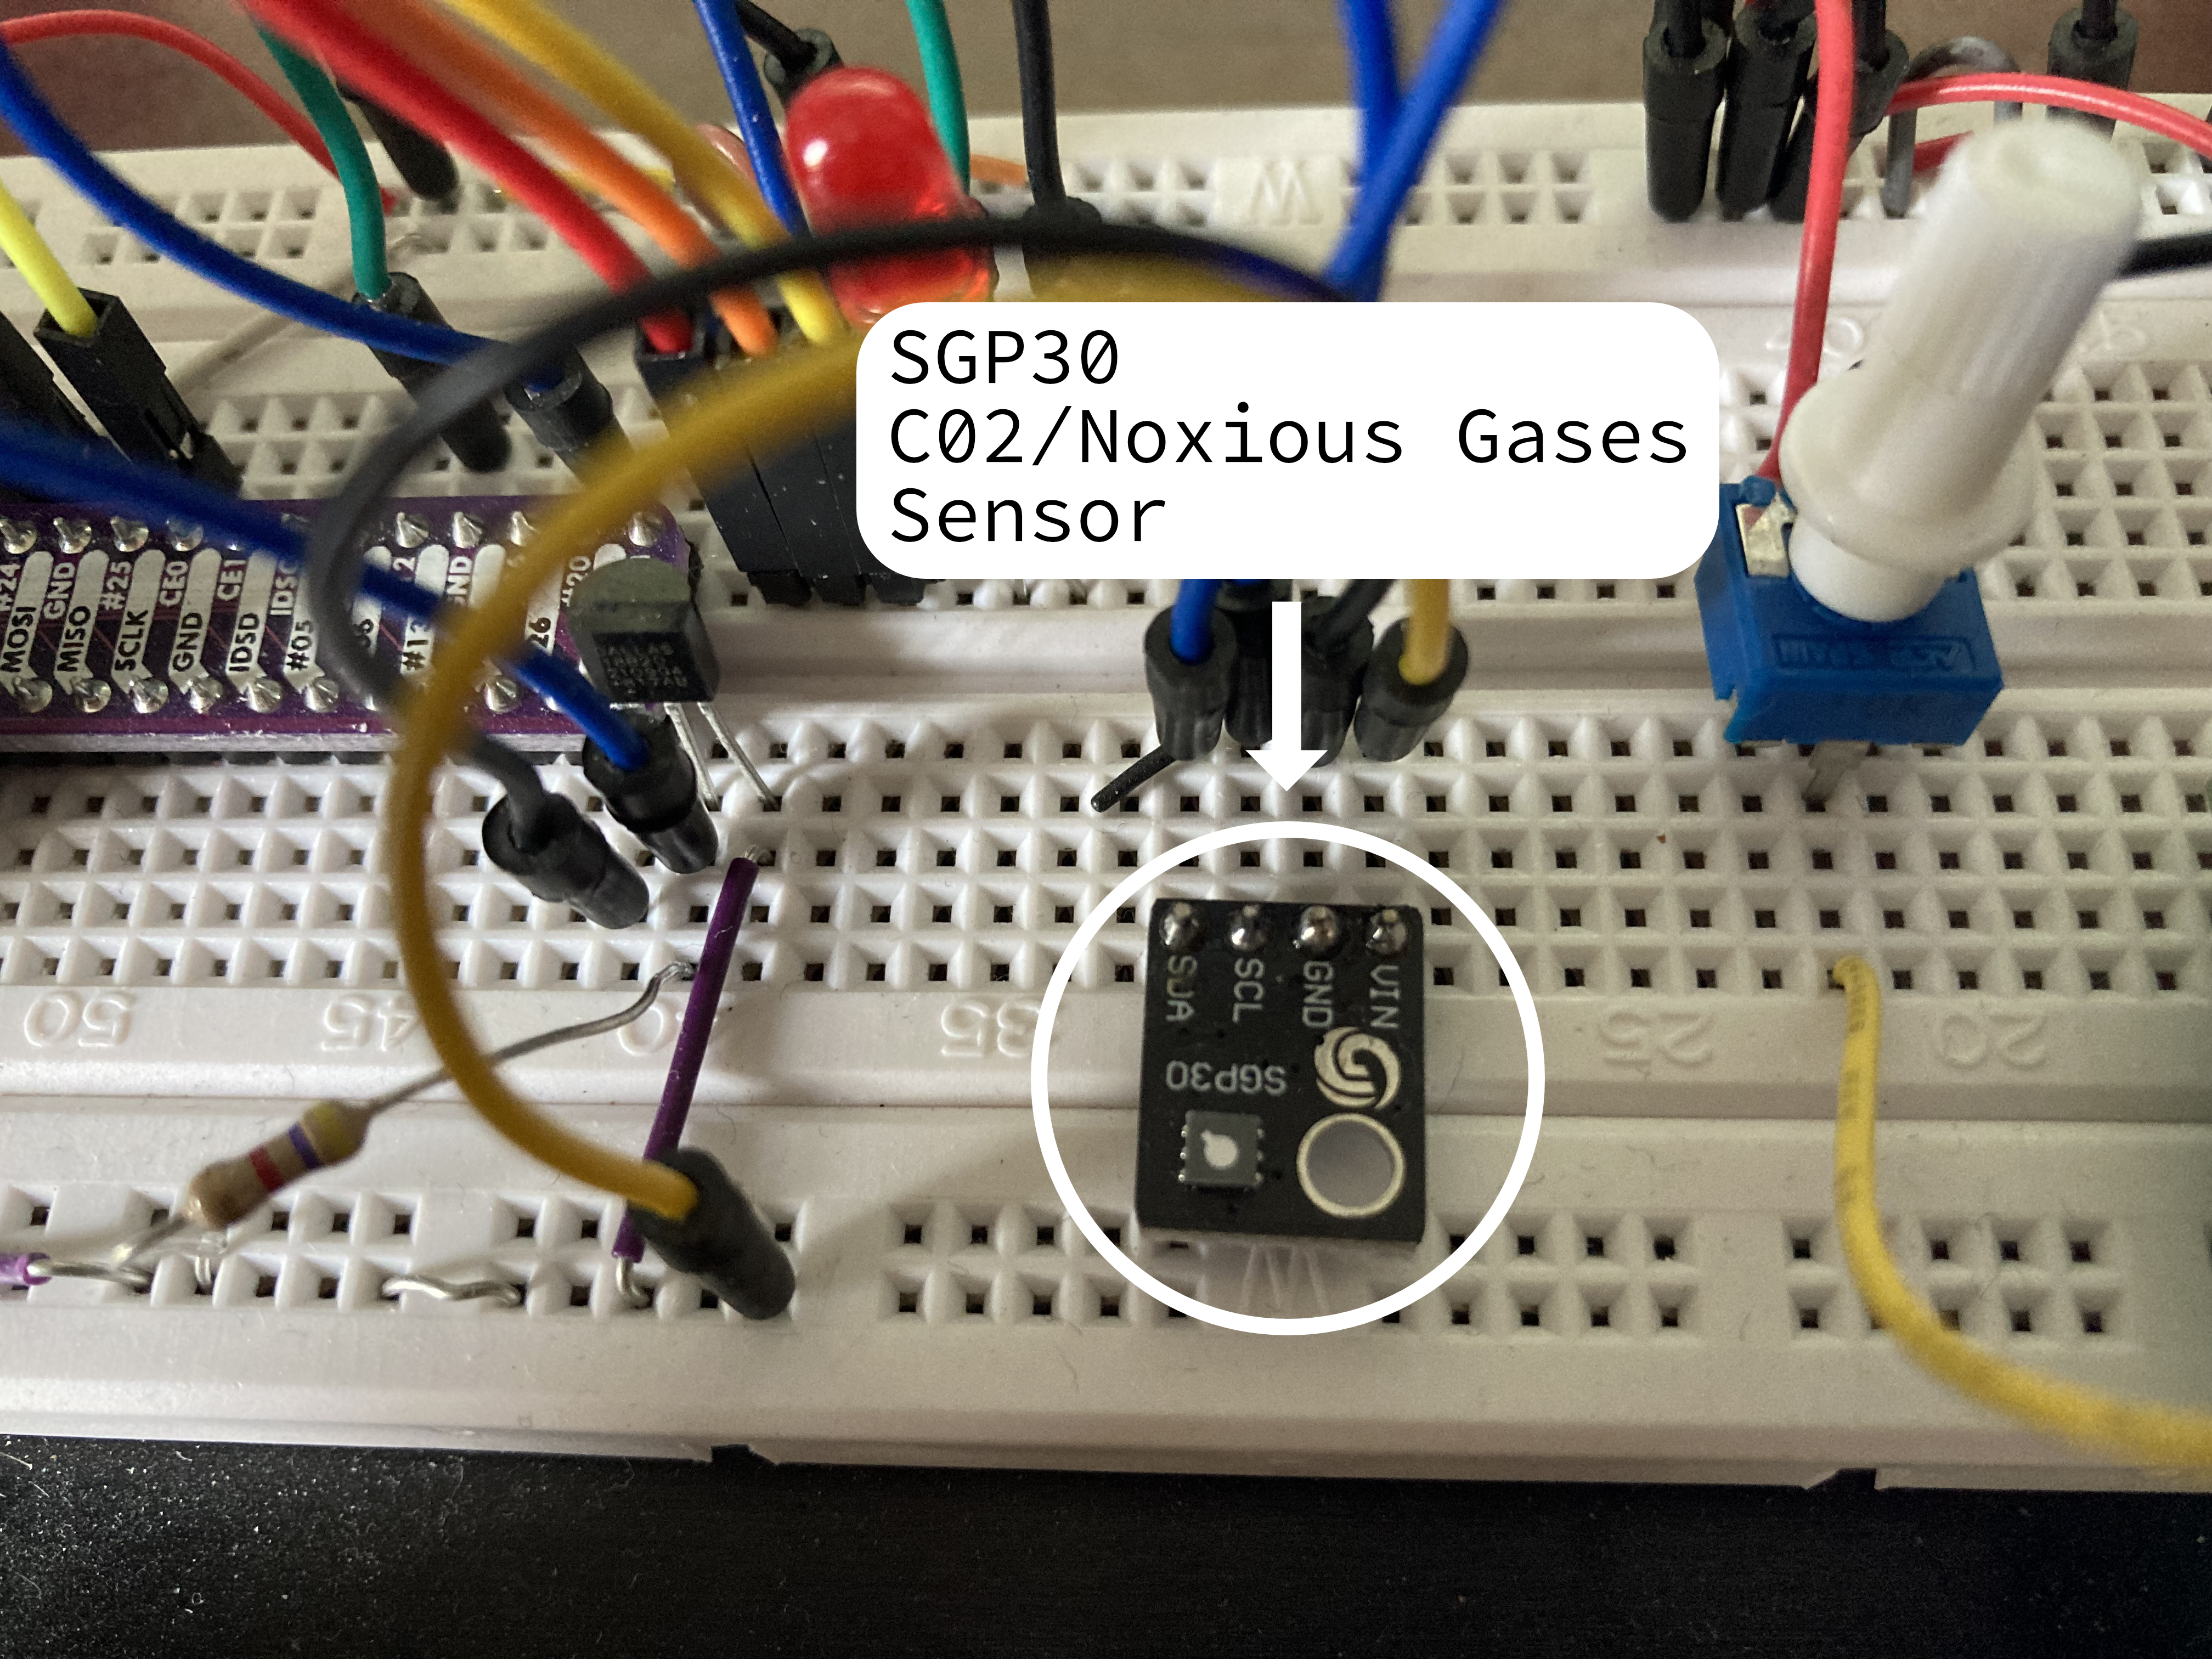
The SGP30 CO2/Noxious Gases sensor
Here is the code for the CO2/noxious gases sensor:
import adafruit_sgp30
import busio
import board

# Other code...

while True:
    # Other code...
    # Read CO2, and TV0C
    try:
        i2c_bus = busio.I2C(board.SCL, board.SDA, frequency=100000)
        sgp30 = adafruit_sgp30.Adafruit_SGP30(i2c_bus)
        eCO2, TVOC = sgp30.iaq_measure()
    except:
        eCO2, TVOC = 0, 0
# Other code...
LCD Display
The LCD display was set up by following Drive a 16x2 LCD with the Raspberry Pi.
Pinout:
LCD Pin |
Function |
|---|---|
01 |
Ground |
02 |
5V |
03 |
Middle of potentiometer |
04 |
GPIO22 |
05 |
Ground |
06 |
GPIO17 |
11 |
GPIO25 |
12 |
GPIO24 |
13 |
GPIO23 |
14 |
GPIO18 |
15 |
5V |
16 |
Ground |
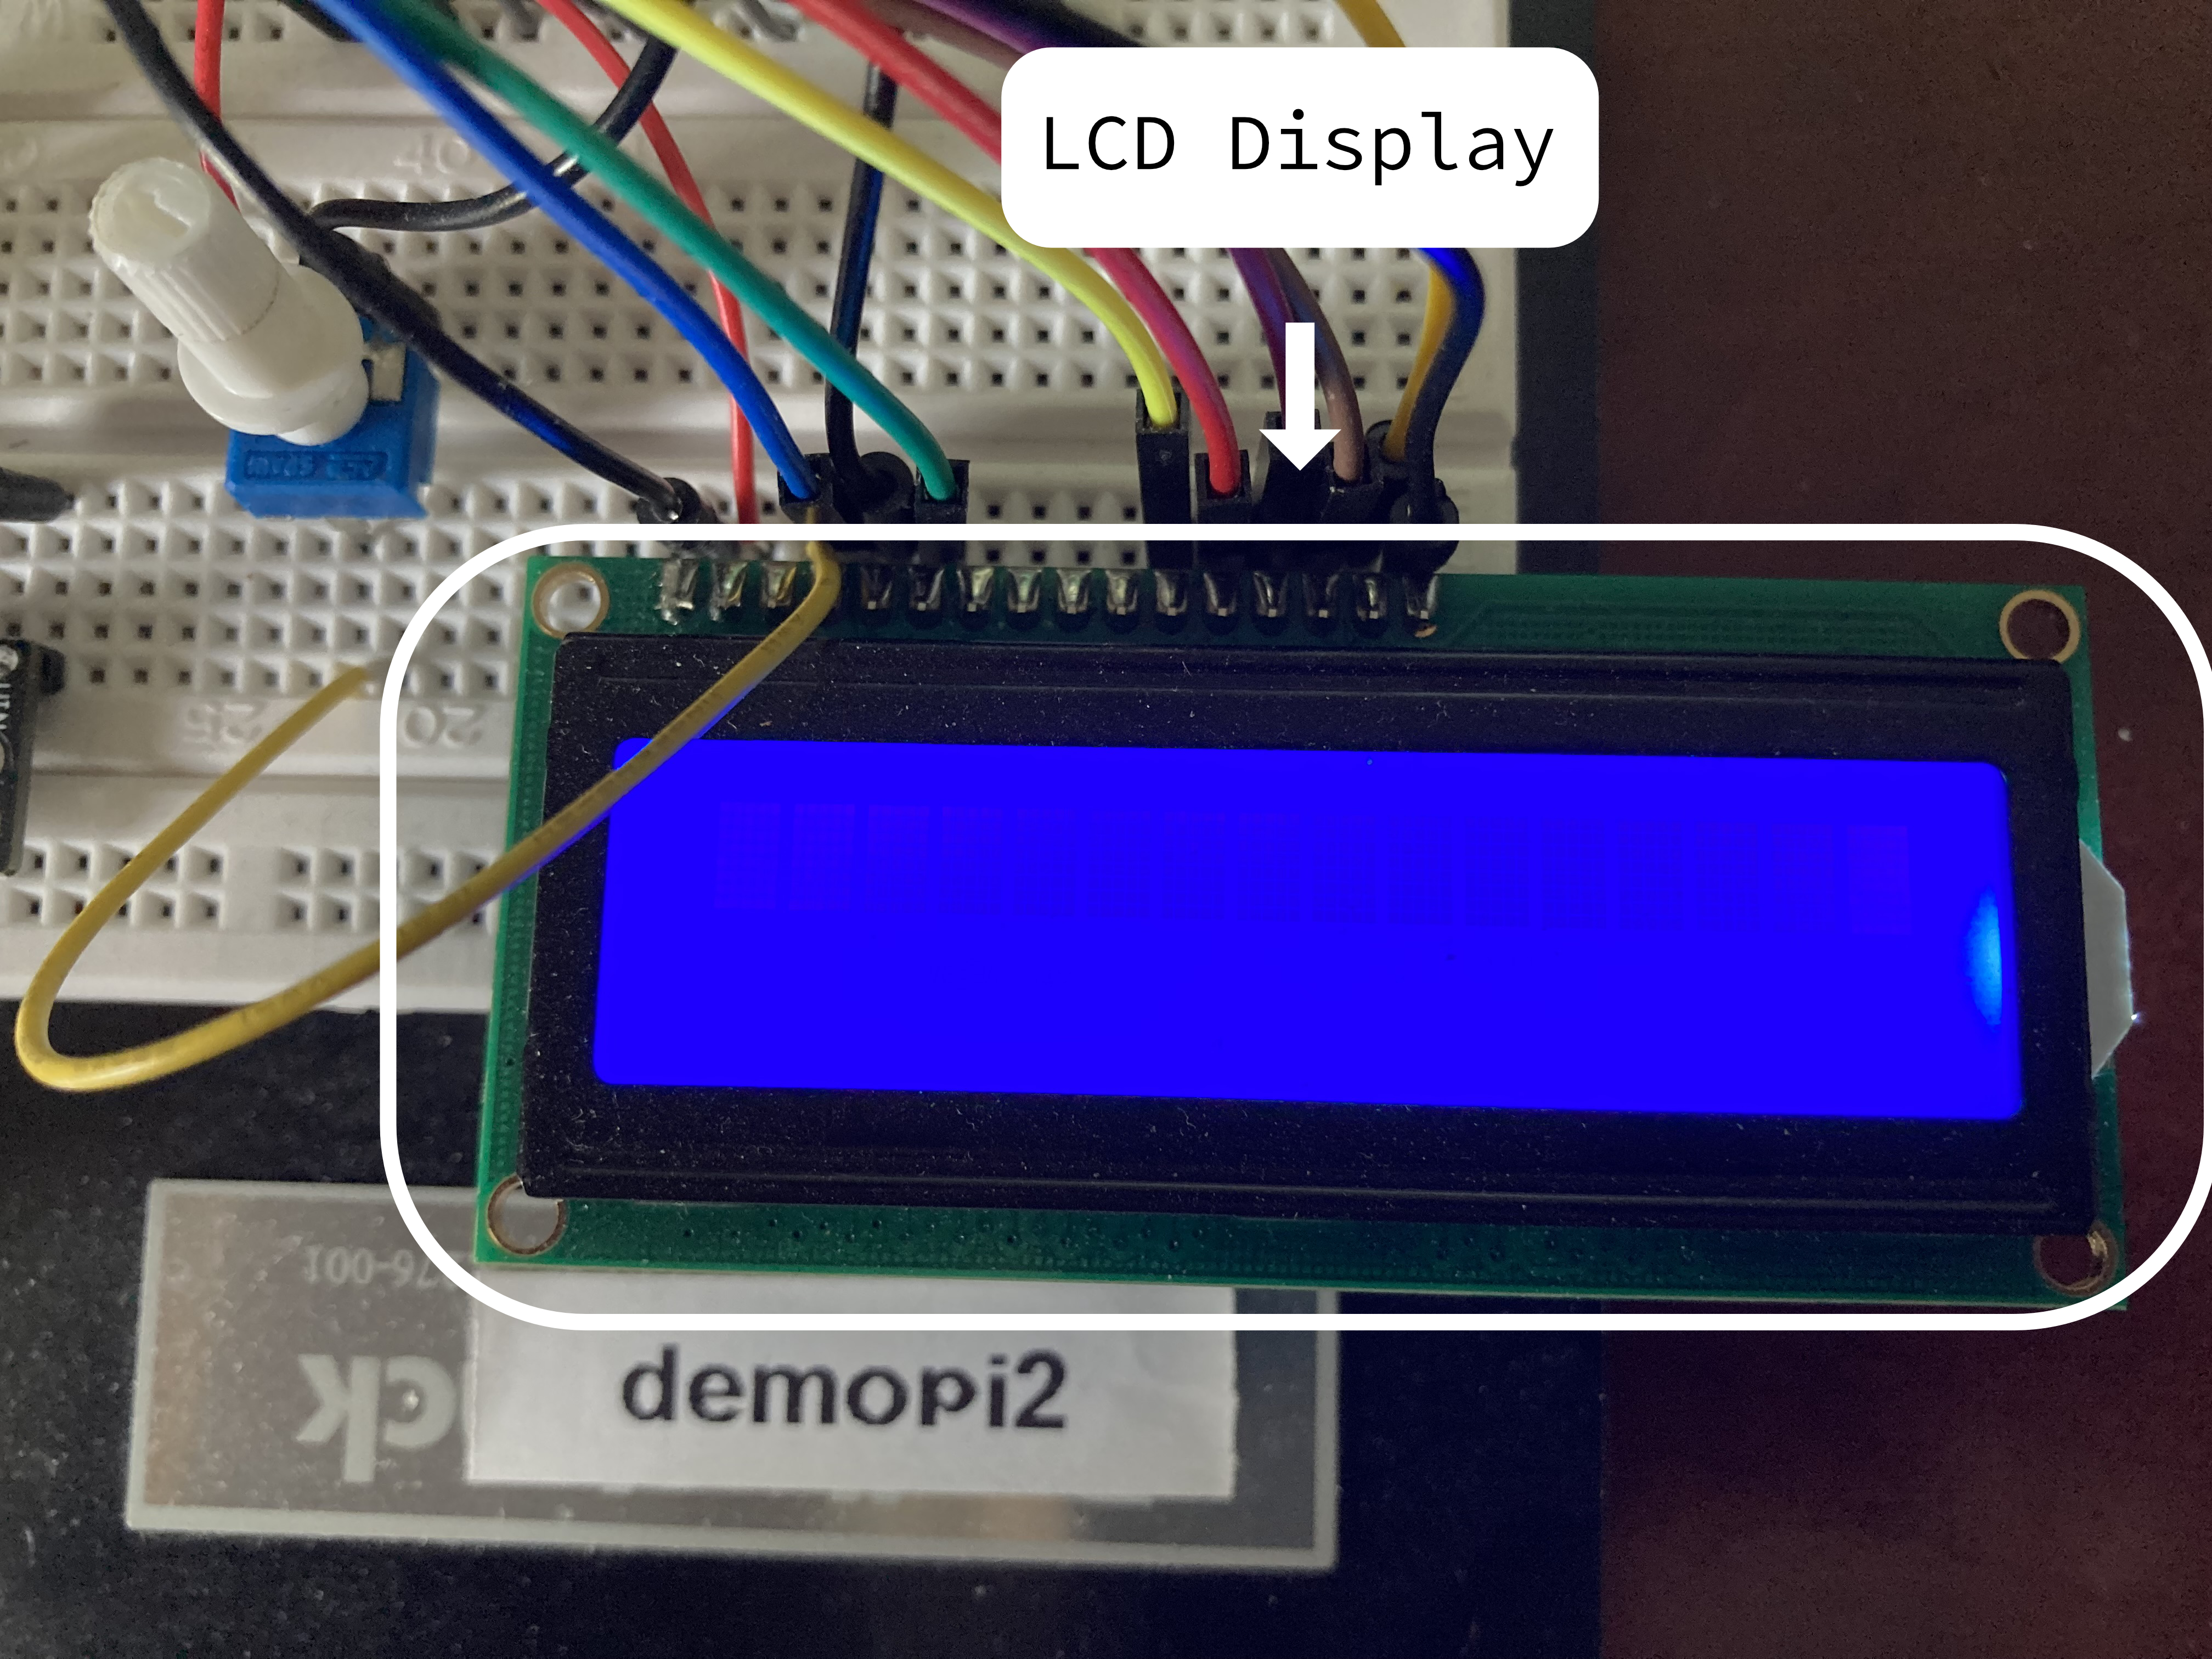
The LCD display.
How the LCD display connects to the breadboard.
Here is the code for the LCD display:
import digitalio
import adafruit_character_lcd.character_lcd as characterlcd
import board
from datetime import datetime
# Modify this if you have a different sized character LCD
lcd_columns = 16
lcd_rows = 2

# compatible with all versions of RPI as of Jan. 2019
# v1 - v3B+
lcd_rs = digitalio.DigitalInOut(board.D22)
lcd_en = digitalio.DigitalInOut(board.D17)
lcd_d4 = digitalio.DigitalInOut(board.D25)
lcd_d5 = digitalio.DigitalInOut(board.D24)
lcd_d6 = digitalio.DigitalInOut(board.D23)
lcd_d7 = digitalio.DigitalInOut(board.D18)

# Initialise the lcd class
lcd = characterlcd.Character_LCD_Mono(lcd_rs, lcd_en, lcd_d4, lcd_d5, lcd_d6,
                                      lcd_d7, lcd_columns, lcd_rows)

lcd.clear()

while True:
    # date and time
lcd_line_1 = datetime.now().strftime('%b %d  %H:%M:%S\n')
# Other code...
lcd_line_2 = str(pir_out) + '|' + str(temp_rounded) + '|' + str(eCO2) + '|' + str(TVOC) + '       '
# Other code...
# combine both lines into one update to the display
lcd.message = lcd_line_1 + lcd_line_2

sleep(1)
Saving data to YottaDB
Outside of Python, set-up a YottaDB database and set-up the environment like this:
$ source $(pkg-config --variable=prefix yottadb)/ydb_env_set
Then execute this code:
import yottadb
from datetime import datetime
while True:
    # Other code...
    yottadb.Key('^motion')[datetime.now().strftime("%m-%d-%Y %H:%M:%S")].value = str(pir_out) + '|' + str(temp_rounded) + '|' + str(eCO2) + '|' + str(TVOC)
    # Other code...
    sleep(1)
YottaDB Replication Set-up
The sending Pi (demopi2)
From a terminal in demopi2, first install YottaDB using the instructions from the Software setup section. Then, set up YottaDB replication as follows:
First, source repl.env, which contains these lines:
export ydb_repl_instname=$HOSTNAME
source $(pkg-config --variable=prefix yottadb)/ydb_env_set
Then run the repl_setup.sh script once and only once, since it is for first time set-up only. It contains these lines:
#!/bin/bash
$ydb_dist/mupip set -replication=on -region DEFAULT,YDBOCTO
$ydb_dist/mupip replicate -instance_create -noreplace
$ydb_dist/mupip backup -replinst=$ydb_repl_instname
Then, create originating_start.sh:
#!/bin/bash
$ydb_dist/mupip replicate -source -start -instsecondary=demopi1 -secondary=demopi1.local:4000 -log=/home/pi/repl_scripts/origin_start.log
$ydb_dist/mupip replicate -source -checkhealth
tail -30 /home/pi/repl_scripts/origin_start.log
Then, create originating_stop.sh:
#!/bin/bash
$ydb_dist/mupip replicate -source -shutdown -timeout=0
$ydb_dist/mupip rundown -region "*"
Finally, run originating_start.sh.
The recieving Pi (demopi1)
First, source repl.env:
export ydb_repl_instname=$HOSTNAME
source $(pkg-config --variable=prefix yottadb)/ydb_env_set
Then, create the repl_setup.sh:
#!/bin/bash
$ydb_dist/mupip set -replication=on -region DEFAULT,YDBOCTO
$ydb_dist/mupip replicate -instance_create -supplementary -noreplace
$ydb_dist/mupip replicate -source -start -passive -instsecondary=dummy -log=/home/pi/repl_scripts/passive_server_start.log -updok
$ydb_dist/mupip replicate -receive -start -listenport=4000 -log=/home/pi/repl_scripts/receive.log -updateresync=/home/pi/repl_scripts/demopi2.repl -initialize
$ydb_dist/mupip replicate -receive -checkhealth
tail -20 /home/pi/repl_scripts/receive.log
Next, create start.sh:
#!/bin/sh
$ydb_dist/mupip replicate -source -start -passive -instsecondary=dummy -log=/home/pi/repl_scripts/passive_server_start.log -updok
$ydb_dist/mupip replicate -receive -start -listenport=4000 -log=/home/pi/repl_scripts/receive.log -autorollback
$ydb_dist/mupip replicate -receive -checkhealth
tail -20 /home/pi/repl_scripts/receive.log
Then, create stop.sh:
#!/bin/sh
$ydb_dist/mupip replicate -receive -shutdown -timeout=0
$ydb_dist/mupip replicate -source -shutdown -timeout=0
$ydb_dist/mupip rundown -region "*"
Next, create repl_status.sh:
#!/bin/bash
echo "-----------------------------------------------------------------"
echo "Source Server $ydb_repl_instname: "
echo "-----------------------------------------------------------------"
$ydb_dist/mupip replicate -source -check
$ydb_dist/mupip replicate -source -showbacklog
echo "-----------------------------------------------------------------"
echo "Receiver Server $ydb_repl_instname: "
echo "-----------------------------------------------------------------"
$ydb_dist/mupip replicate -receive -check
$ydb_dist/mupip replicate -rece -showbacklog
Note
Due to how replication works in YottaDB, repl_setup.sh combines both the set-up of supplementary replication and the first start-up. This means that you DO NOT run start.sh the first time you start replication. It's confusing, but please keep that in mind.
The next time you start replication, do not use repl_setup.sh but use start.sh.
Octo Set-up
You already installed Octo when you installed YottaDB using ydbinstall.sh above. Now, all you need to do is create a table and configure Octo for remote use with various clients.
First, load the "Motion" table into Octo and test it:
cat > motion.sql << 'END'
DROP TABLE IF EXISTS MOTION;
CREATE TABLE MOTION(
        `DATETIME` TEXT PRIMARY KEY,
        MOTION INTEGER,
        TEMPERATURE NUMERIC,
        CO2 INTEGER,
        TVOC INTEGER
) GLOBAL "^motion" READONLY;
END
octo -f motion.sql
octo <<< 'select count(*) from motion'
Then, configure remote access with Rocto:
# Copy ``octo.conf`` to your home directory
cp $ydb_dist/plugin/octo/octo.conf ~
# Add a username/password (here "sam") to enable remote Rocto connections
yottadb -r %ydboctoAdmin add user sam # (enter password)
# Finally, start Rocto with the verbose flag.
rocto -v
Next, on a Windows with Microsoft Excel installed, install version 13 of the Postgres ODBC driver from the PostgreSQL ODBC downloads page. Then, using the ODBC administrator (odbcad32.exe) create a User DSN and set "Postgres Unicode(x64)" as the driver.
Next, set the following settings: adjust server, port, user name and password:
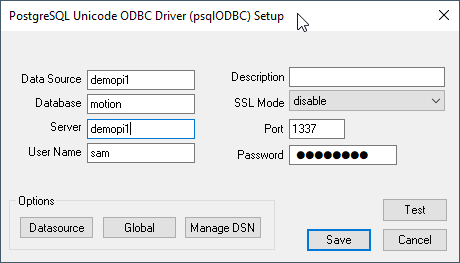
Then, press the "test" button to ensure that you can connect successfully. More information on these steps can be found in Configure ODBC drivers for PostgreSQL.
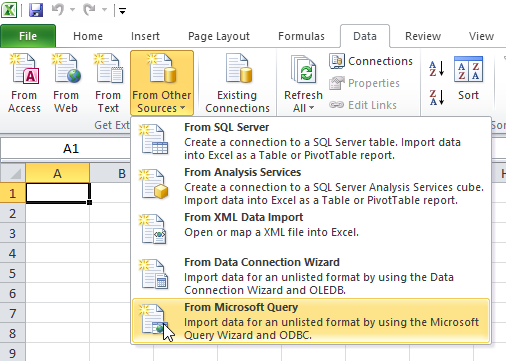
Once you can connect successfully, in Excel in a new worksheet, click on Data Tab > From Other Sources > From Microsoft Query:
Then, select the data source (here demopi1):

Note
The new ODBC data source may not appear if the architecture targeted by the driver doesn't match the one used by Excel. For instance, if Excel is 32-bit (x32), but the 64-bit (x64) PostgreSQL ODBC driver is used, then any data source defined using this driver will not appear in Microsoft Query in Excel.
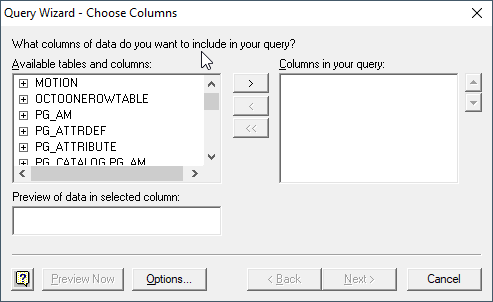
Choose the MOTION table and add all columns in the Query Wizard:
Press Next, Next, Finish, and wait for the query to finish executing.
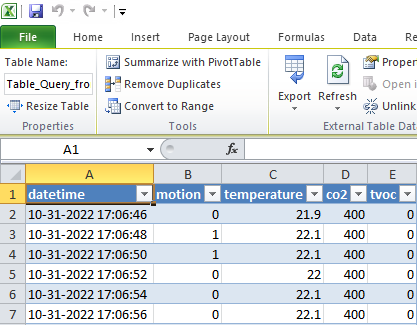
The data will now be in Excel:
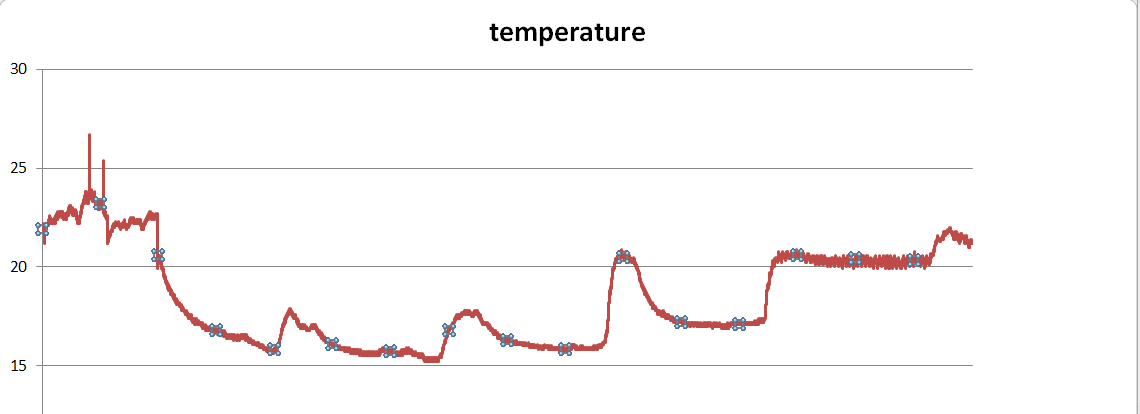
You can then graph the data. We will not describe this process, but we will leave it to the imagination of the end user.
Here's a sample result:
Rocto also accepts JDBC Postgres driver queries using LibreOffice sheets.
Shutdown/Start-up Sequence
After the above initial set-up the following commands can be used for to shut down and start up the Pi sensor application:
Shutdown:
Source
repl.envOn sensor Pi, stop
demo.pyOn sensor Pi, stop replication (
originating_stop.sh)On receiving Pi, stop
roctoOn receiving Pi, stop replication (
stop.sh)
Start-up:
Source
repl.envOn sensor Pi, start replication (
originating_start.sh)On sensor Pi, start
demo.pyOn receiving Pi, start replication (
start.sh)On receiving Pi, check status using
repl_status.shuntil the status shows that the two machines are in syncOn receiving Pi, start
rocto
